- Audio Recorder Home
- Order Audio Recorder
- Audio Recorder Support
- Audio Recorder Sales
- Audio Recorder Screen Shots
- Audio Recorder Tutorial
|
Record screen sequences and broadcast screen video live! |
|
Audio Conversion Power at your fingertips! |
Audio Capture using Huelix Audio Recorder - Get started in seconds!
- Launch Huelix Audio Recorder by clicking on the desktop or program icon.
- The application comes up ready to record as indicated by the message on the main blue-colored screen.
- Where does it record audio from? The answer is, whatever audio port is currently selected in the system.
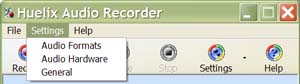
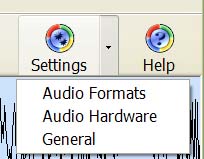
- Click the small arrow near the Settings toolbar or select the menu
item Settings | Audio Hardware (Alt-S-H).
- The default audio hardware appears on the list and is automatically selected. You are most likely to have just one of them.
- Let us try to select "what you hear" first, as this requires no external input device like a microphone.
- From the "Select Port and Set Volume" group on the right side
of the screen, select "Stereo Mix", which is the speakers output in
stereo. This could be named differently depending on your hardware. Common
names are "Sum", "Wave Out Mix", "What You Hear", and so on.
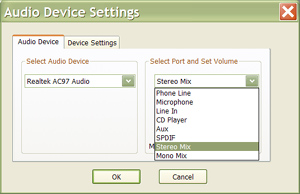
- Adjust the recording volume slider below the list of ports. Start with a low volume to avoid distortion (about a quarter of the way from the left).
- Accept changes in the configuration screen by clicking OK. Play your favorite music CD or other audio file in your favorite audio player, such as the Windows Media Player. The idea is to capture the music being played in another application.
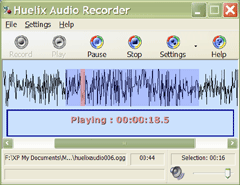
- From the main interface tool bar, click "Record". The current active compression format is displayed at the bottom of the interface. Stop after a while. You will see that the recorded file gets loaded and the waveform display appears.
- Play the file by clicking "Play". You should hear the audio that you recorded a while ago. That's it to get started!
- Change the compression formats, audio hardware configurations etc and repeat the process. Within minutes, you should be able to master Huelix Audio Recorder!
- Consult the help file for details any time you need directions by clicking the Help tool bar button.
Please check out the detailed tutorial for more details.
   Screen shots |
Huelix Audio Recorder Home | Order Audio Recorder | Audio Recorder Download | Audio Recorder Support | Audio Recorder Screen Shots | About Us
Privacy Policy | Website Feedback
Copyright © Huelix Solutions Private Ltd, 2003-2010. All rights reserved.