- Audio Recorder Home
- Order Audio Recorder
- Audio Recorder Support
- Audio Recorder Sales
- Audio Recorder Screen Shots
- Audio Recorder Tutorial
|
Record screen sequences and broadcast screen video live! |
|
Audio Conversion Power at your fingertips! |
Configuring Audio Hardware for Audio Capture
Huelix Audio recorder allows you to completely configure your audio hardware (audio device/sound card/external sound hardware) so as to get the maximum performance out of it. For example, most PC's are equipped with audio devices that can capture audio at significantly higher sampling rates than CD quality. This is useful, if you need to make very high quality recordings that you intend to archive and may be subsequently process.
The Audio Hardware configuration screen is shown below:
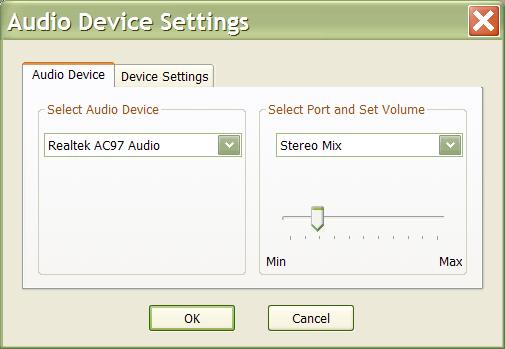
Select Audio Device
All audio hardware devices found in the system are available in the drop list. Typically, PC's have only one sound device, though there can be more than one. If there are more than one device in the list, select it to activate it.
Select Port and Set Volume
The drop list allows you to select the appropriate port that has incoming audio. If you are using a microphone, select Microphone from the list. The actual names will differ from manufacturer to manufacturer, so use your judgment if you don't see the exact names mentioned here. Other commonly found audio ports are Line-in (which can be used to record audio from a LP player or tape player), Stereo Mix (which is the speakers out in stereo), Mono Mix (which is the speakers output in mono), Phone-line etc..
Note that some systems may call the speaker output by different names such as Sum, WAVE, 'What You Hear' etc. Consult your audio hardware documentation or manufacturer's website for details.
The recording volume can be adjusted using the slider below the list for each channel. This is wired to the system and any changes you make here are immediately reflected in the system settings. You may wish to experiment with a few trial recordings before you settle down on the appropriate recording volume. Note that a high recording volume will severely degrade the quality of recorded audio.
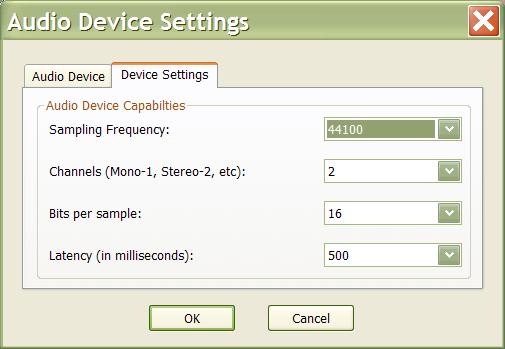
Audio Device Capabilities
This screen enables you to fine tune several aspects of your audio hardware.
Sampling Frequency: The sampling frequency determines how accurately the audio is digitized. Higher the sampling frequency, the better the digital audio quality. Using higher sampling frequencies will increase the amount of data to be compressed, so it can cause performance degradation if you have an under-powered PC. Use higher frequencies when you have matching compressors - e.g., Windows Media Professional codecs.
In general, you should match the compressor settings to the audio device settings.
Channels: This determines how many channels of the audio is captured. Usually you want to set it to 2 which denotes stereo. However, for recording voice and other low quality audio, you may want to set it to mono.
In general, you should match the compressor settings to the audio device settings.
Bits per Sample: This determines the size of each digital audio sample. The higher the sample size, the better the audio dynamic range. Not all codecs will support sample sizes bigger than 16. Usually you want to set it to 16.
Latency: Latency refers to the amount of audio buffered. Higher latency is best for recording, so you should set it to the default 500 where possible.
However, if you are previewing audio while recording (for example, hearing what you speak into a microphone), this introduces a delay. In this case, set the latency to an acceptable lower value. See:
Recording MP3, WMA, OGG, and WAV audio from a microphone
Recording MP3, WMA, OGG, and WAV audio from line in port
Recording MP3, WMA, OGG, and WAV audio from the speakers
  Screen shots Quick Start Guide |
Huelix Audio Recorder Home | Order Audio Recorder | Audio Recorder Download | Audio Recorder Support | Audio Recorder Screen Shots | Huelix Solutions
Privacy Policy | Website Feedback
Copyright © Huelix Solutions Private Ltd, 2003-2010. All rights reserved.